How to Install Solid Wood Stairs
Step #1:
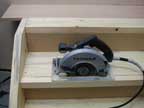 Typical
construction stairs (ie. those under the carpet) are design
with a lip on the front... so the first job of the day in
order to install new solid wood stairs is to remove this nosing.
It will be recreated when the new step is put in place. Use
a power saw, hand saw and/or chisel to accomplish this.
Typical
construction stairs (ie. those under the carpet) are design
with a lip on the front... so the first job of the day in
order to install new solid wood stairs is to remove this nosing.
It will be recreated when the new step is put in place. Use
a power saw, hand saw and/or chisel to accomplish this.
Step #2
-- and this will vary depending on your step layout
 Cover
your Stringers (the side walls of your steps) in a decorative
1/4" thick plywood to match your new steps. In some cases
you will create a "false" stringer to glue to the
drywall because that is the appearand that you prefer. In
other cases you may already have a stringer showing and have
no choice but to reface it with something a bit nicer.
Cover
your Stringers (the side walls of your steps) in a decorative
1/4" thick plywood to match your new steps. In some cases
you will create a "false" stringer to glue to the
drywall because that is the appearand that you prefer. In
other cases you may already have a stringer showing and have
no choice but to reface it with something a bit nicer.
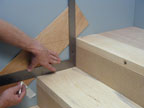 Cut
a long strip of cardboard and with the help of a square create
a template. Use this to cut the decorative plywood.... much
more enjoyable when you can make as many mistakes as you like
on a scrap piece of cardboard.
Cut
a long strip of cardboard and with the help of a square create
a template. Use this to cut the decorative plywood.... much
more enjoyable when you can make as many mistakes as you like
on a scrap piece of cardboard.
Step #3: Risers
Out of the same material cut the right number of rectangular pieces of plywood to cover the back of the each step. Fit and number each piece, starting at the top and working down... I think you'll find that not every step is exactly the same size.
Step #4: Steps
In the same way, take your new hardwood stairs and trim them to fit. Number each hardwood plank, as you work down the stairs.
Step #5: Finishing
Take all your various pieces off site and finish them. Most polyurathanes do not come to full strenth for 24-48 hours, so I'd highly recommend that you let them sit for a day or two before attempting to install.. I know you're eager but patience with prevent premature denting and damage to the finish of your wood stairs.
Step #6: Installation
Install any stringer coverings that you might have created in step one.
Then start at the top of the stairs, install the first piece of plywood you trimmed for the top riser, butting it up tight to the underside of the upper, main floor nosing. Glue into place and add a few finishing nails.
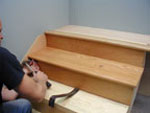 Take
tread #1 and apply construction glue, install.. then add a
few 2 1/2" spiral finishing nails, from the top face,
to hold it in place with the glue dries....fill holes with
an appropriate stick. Continue down the steps with the riser
first, pushed up tight to the underside of the tread above
and then the next riser.
Take
tread #1 and apply construction glue, install.. then add a
few 2 1/2" spiral finishing nails, from the top face,
to hold it in place with the glue dries....fill holes with
an appropriate stick. Continue down the steps with the riser
first, pushed up tight to the underside of the tread above
and then the next riser.
The glues today are great, and offer enough strength to hold the steps in place. If you use predrilled holes, screws and plugs ..... it is very messy to get a nice finish if you have already prefinished the steps prior to installation....and I would always do that so I'm not tying up the staircase trying to get the polyurathane to dry with kids waiting at the bottom.
NOTES:
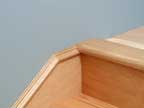 This
is just a detail picture to show you how to cap the plywood,
if you end up installing a false stringer against the drywall.
This
is just a detail picture to show you how to cap the plywood,
if you end up installing a false stringer against the drywall.
If you have an open set of stairs then here are a few tips on removing and perserving your existing handrail.
to purchase Hardwood Stairs link to our sister site