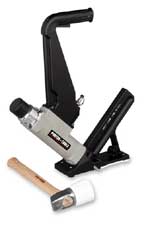
Pneumatic Floor Nailer
 Power:
The typical Pnuematic Flooring Cleat Nailer, uses a compressor
to provide air at approximately 70-100 psi as the power source
to drive the cleats into a wood floor. It still uses a hammer
to active the driver head, but the power stroke is significantly
reduced as compared to a manual floor nailer.... even a weakling
like me can handle the job.. in fact you muslce bound guys have
to be careful NOT to over hit the driver head or you'll spend
a lot of money in replacement parts :)
The actual pressure setting can vary for a number of reasons:
- Type of wood. Very dense woods like Brazilian Cherry require
higher PSI settings
- Thicker floors need longer nails, thus 2" floor cleats
will need more air then the 1 1/2" cleats.
- if you must leave the compressor in the garage and run 200'
of air hose, you will experience pressure loss through the length
of the hose, thus require higher pressure settings at the compressor
itself.
- and lastly, some pneumatic floor nailers use staples and some
use "L" or "T" shaped cleats. I have found
that the cleats require more air then the staples... which should
make sense because the staples are often thinner.
Bottom line is though, it is all about practice. You must experiment
with your nailer FIRST! Don't give your first try when you are
installing your good wood floor.
Too much pressure:
- you will break the tongues of your hardwood floor
- tongues will then cause cracking and creeking in your floor
Too little pressure:
- nails don't seat themselves properly in the groove of the
floor
- this then prevents the next board from installing tight to
its neighbour allowing moisture and dirt penetration below the
surface.
Solution:
- experiment first as suggested earlier
- move your regulator closer to the installation (if you are
forced to leave the compressor in the garage) this will allow
you to more accurately control the PSI
Loading Nails: This is one thing I would always check
either with the pneumatic or manual nailer. Try installing
floor cleats, into the gun you are looking to purchase to make sure
that it is a smooth process and that the carosol holds enough
nails (100+) so that you are not constantly getting up to refill
Nail Shoes: These shoes attach to the bottom face of the
nailer to allow the typical floor nailer to adapt to various thicknesses
of hardwood flooring. Usually the shoe for 3/4" hardwood
flooring is standard with all nailers. Some manufacturers also
include a number of extras in the package, to accomodate 3/8-5/8"
floors, others upcharge, so be sure to ask if this is something
you require.
Face Nailing: ask how this particular floor nailer handles
the face nailing of the first few rows. Some manufacturer have
a completely separate tool for that purpose, others have an adapter
plate. ASK, so you don't get a surprise.
Jambed Nails: This is a given. You will always have times
when life just doesn't flow and every second nail jambs in the
nailer (often an indication of a bent driver head) so ask how
your rectify this. If you have to bring out the heavy duty tool
box to take the head apart and remove a jambed nail, you are not
going to be too happy.
 Lubrication:
most air tools require some sort of lubrication, preferring a
light oil especially designed for this purpose. Frequency will
of course depend on usage, but also on the quality of your air.
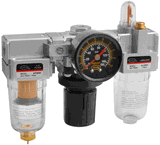
I have a water filter on my air line that picks up moisture that
has condensed in the hose. This helps prevent water migration
into the metal parts of my tools, and extends their life. It is
similar to the set up in the picture on the right AND since I
have a habit of forgetting to add the oil, I have also installed
an automatic oiler with a built in regulator.. the all in-one-solution
that you could mount to your compressor. If that seems just too
bulky then just add a few drops of air tool oil to the air fitting
on the end of your pneumatic floor nailer everytime your use it
and that will help alot.
Further Information:
Installing Hardwood Flooring